Using custom typography in website design has long been a Holy Grail for designers. Over the past few years, several third party methods have evolved which allow developers to include unique type families to their work, including sIFR, FLIR and Cufon. While all these methods have their unique strengths and weaknesses, they all likewise share the inherent status of being “workarounds” for a lack of native custom typeface support in an HTML environment.
Enter @font-face
With the advent of CSS 3.0, support for non-machine resident fonts became part of the working standard for website design. No longer consigned to the limitations of third party solutions, designers and developers can now (theoretically) purchase unique fonts for their work, license those fonts for web use and — voila! — create sites as typographically rich as any piece of print design. Of course theory and reality are always where the “rubber hits the road” in website design and the @font-face rule is no exception. We recently had the chance to integrate a custom typeface into one of our sites. In this post I’ll outline the challenges we faced and how these were overcome.
Challenge #1: Licensing Issues
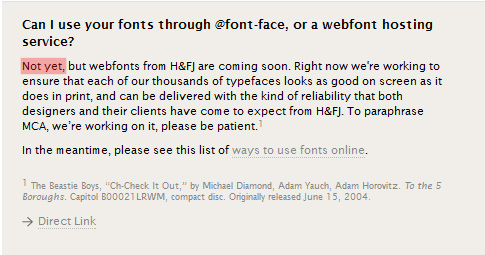
Our first challenge came when we were asked to duplicate a typeface favored by our client in their print collateral. The face, which is the lovely Gotham face (designed by Hoefler & Frere-Jones) immediately sent us scurrying to find out what H & FJ’s web licensing policies were. Lucky for us, those policies were clearly defined for us on their “licensing and usage” section. Unlucky for us, though, web usage via @font-face is currently expressly forbidden. (See below…)
Searching for answers, we reached out to an online type vendor for suggestions on typefaces which have similar qualities to our client’s favorite. Ultimately, the folks at Fontshop suggested a font similar in look and feel to Gotham. One purchase and download later, we had nabbed Effra Std Light and we were on our way. (As an aside, Effra is a typeface created by Dalton Maag and we’re happy to report that their licensing agreement is significantly more accommodating for web use than most foundries…)
Challenge #2: Turning that Licensed Font into Formats Browsers Understand…
Once we found a font which suited our needs and could be licensed, we were faced with only two remaining tasks…
First, we needed to convert the fonts we purchased as Opentype TT outlines into web ready formats. Here’s where things get a bit tricky again. Currently support for web fonts varies from browser to browser. Basically, different browsers need or prefer to load different file types. Thankfully, various tools have been developed to easily convert one set of fonts into the multiple types required by the various browsers. The tool we used is Fontsquirrel. Fontsquirrel is a handy, dashboard-driven tool that lets you specify not only what web formats you would like to output your font files to but also allows the user to tweak output in a whole bunch of esoteric ways. (I’m not going to get too granular here; if you really want to see the dashboard in action, just go to Fontsquirrel’s site…) After you choose all your options and upload your fonts, Fontsquirrel provides you with a downloadable Zip, with your fonts output to the various filetypes needed for browser support. Also, your Zip file contains code which will give you a big leg up in solving Challenge #4…
Challenge #3: Writing the Necessary CSS…
Okay — at the risk of being accused of “Gotcha! Blog Writing” I have to come clean here. Writing the code necessary to support the @fontface command for your new fonts is actually a no-brainer. That’s because Fontsquirrel basically does it for you! In the Zip file Fontsquirrel gives you, there’s a stylesheet already included. All the user really has to do is change the ‘url’ references to whatever location you ultimately desire and those fonts will load on site view. Here, for example, is how the code shipped for one of my typefaces:
@font-face {
font-family: ‘EffraLight’;
src: url(‘effra_std_lt-webfont.eot’);
src: url(‘effra_std_lt-webfont.eot?#iefix’)
format(’embedded-opentype’),
url(‘effra_std_lt-webfont.woff’) format(‘woff’),
url(‘effra_std_lt-webfont.ttf’) format(‘truetype’),
url(‘effra_std_lt-webfont.svg#EffraLight’) format(‘svg’);
font-weight: normal;
font-style: normal;
}
And, here, is what the entire family looks like within our eventual CSS stylesheet:

Finishing Things Off
Once you’ve got your fonts defined in your CSS, the only thing remaining is to use those in the font stacks you define in the Typography section of your CSS code. To do that, just reference the font family names given to you by Fontsquirrel in your font stacks. And, of course, it’s always a good idea to define some backups, just in case something should go wrong and your visitor ends up having to view your site using their own machine’s fonts…