
Summary: In this post, we will walk you through our 8 steps of performing a fast, cheap and easy SEO audit.
SEO audits are an important process in ensuring your website is optimized for search engines (such as Google), in order for them to understand and rank your site so you can be found by users.
These audits should typically be done after major edits to your website (to confirm everything was set up correctly), as well as about every 6 months, as search engine requirements and rules tend to change. The purpose of these audits is to identify issues that you can later correct – but technically, fixing the issues isn’t part of the audit itself.
Read on to learn our 8 recommended SEO audit steps.
Step 1: Ensure users only end up at one version of your site
Users can type in a web address in various ways – for example https://website.com vs www.website.com – and each of these variations technically leads to an entirely different website. You want to make sure that you choose one canonical, or “official,” version of the web address and then have the other possibilities 301 redirect to this version. That way, search engines won’t be confused by the various versions of your website, which can negatively affect your rankings.

To check this, you can simply type in different variations of your web address to make sure they all redirect to the canonical version (or, if you haven’t chosen a canonical version, do so now, and make a note to add 301 redirects once your audit is complete).
It’s also important to make sure your site has SSL protection, as there’s now a slight rankings boost for having a site that begins with https:// – and Google Chrome will mark non-SSL protected sites as “unsecure,” which could deter users from visiting.
Step 2: Perform a site crawl
The next step in an SEO audit is to perform a site crawl – in other words, to comb through your site and see which pages search engines see and list, as well as help identify errors like duplicate content, broken links, and title tag issues.
For this step, you can use SEMrush’s paid site audit tool, or free alternatives like Google Search Console, SEO SiteCheckup, or Screaming Frog SEO Spider (which has both paid and free options).
In addition to crawling your website through these services, you should also Google search “site:yourwebsite” (and replace “yourwebsite” with your actual website url), which will bring up a list of all of your site pages that Google can see – and you can compare these results to those given by your chosen site audit tool.

It’s also a good idea to do a Google search for your company or brand name, just to make sure you rank (and if you don’t, you now know that this is something you need to address once you start correcting issues).
Step 3: Check XML sitemap and robots.txt file
The XML sitemap and robots.txt file are important aspects of your website for search engines (not necessarily for users). They essentially provide search engines with an explanation of what pages on your site are important and how the site should be crawled.
You can access the XML sitemap through Google Search Console (there’s a section in the left panel called “Sitemaps”), and if an XML sitemap isn’t added yet, you can add it now. You can also use SEO SiteCheckup to check whether the sitemap is added, or try typing in your website url, with sitemap.xml added to the end (ex. www.website.com/sitemap.xml). Once you’ve accessed the XML sitemap, you’ll want to make sure that all pages are present and there are no duplicates, as well as that the sitemap is properly formatted.
You can access the robots.txt file similarly, by visiting www.website.com/robots.txt (and you can also use SEO SiteCheckup to make sure a robotos.txt file is available, if you’re not sure). The important thing to do here is look through the listed pages and make sure none of the pages with “Disallow:” in front of them are relevant, as this label tells search engines not to crawl this page (and you wouldn’t want search engines to stay away from important pages on your site). You can find more information about formatting the robots.txt file here.
Step 4: Check on-page SEO
The next step of this process is to check several SEO elements of your current your site pages:
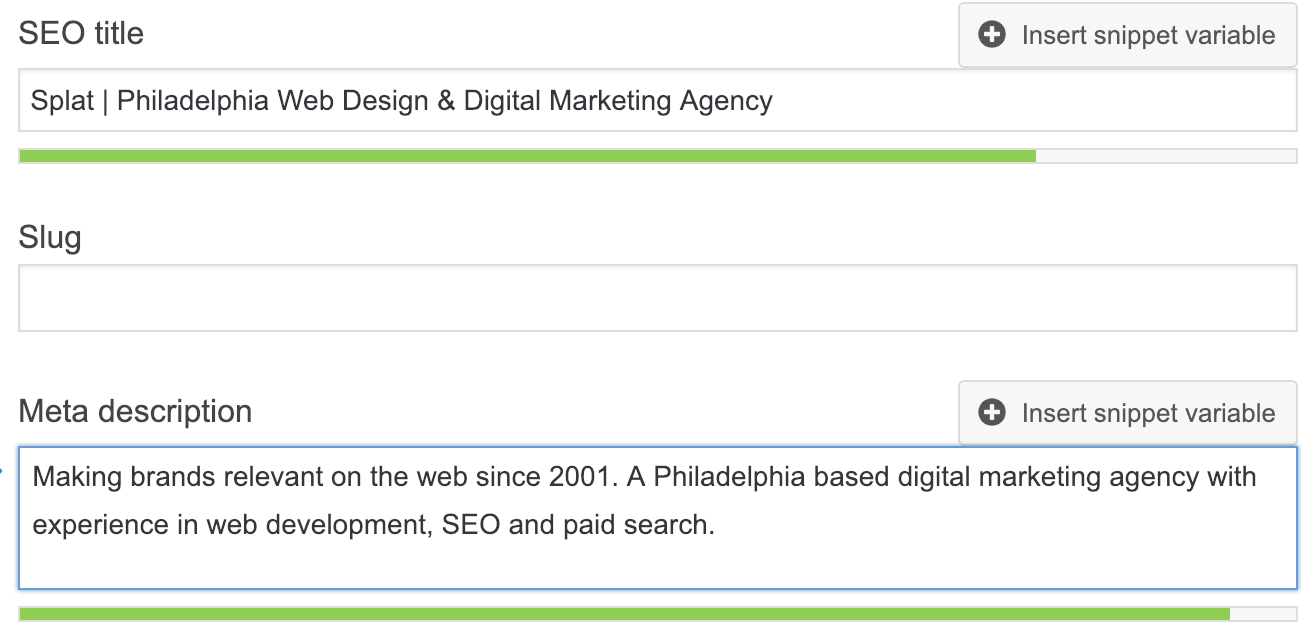
- Make sure the title tags and meta descriptions of each page are the correct length and relevant to that page’s content;
- Make sure every page includes a focus keyword that’s listed in the first 100 words of the page’s content;
- And make there are no duplicate pages, headers, and/or title tags, or multiple pages that use the same focus keyword.
- (If you do find multiple pages using the same focus keyword, you should compile a spreadsheet that groups these pages together so you can later determine whether you want to merge them into one page, or delete one of the pages and 301 redirect to the “better” page; this will improve search engines’ understandings of what pages of your site are most relevant to users.)
For this step, you can use SEMrush, as well as the free alternatives Siteliner or Copyscape (which looks specifically for duplicates of pages); you can also manually look through each of the pages on your site (which is better if your site has fewer pages; otherwise, it can become too time-consuming).
Step 5: Check internal/external links
As you’re working through your site, you’ve probably already gotten information about the links on your pages (specifically from the crawl report in step 2); however, checking internal/external links is listed as its own step because it’s very important to make sure that none of your links are broken.
Again, you can either find this information from your crawl report, or specifically locate broken links using a tool like Dr. Link Check or SEMrush. Scan through this list now to see how many issues you have, and, once you’re finished with your SEO audit, come back to any broken links you’ve found and either remove them, edit the link, or find a different working page you can link to.
Step 6: Check site speed
Step six in this process is to check how quickly your website is loading. Ideally, your site should load in less than 3 seconds, otherwise users can become frustrated and leave your site, which, in turn, negatively affects your rankings (as Google takes bounce rate into consideration).
For this step, you can use Google’s PageSpeed Insights, which will tell you the site speed for both mobile and desktop versions of your site, as well as provides recommendations for how to improve your site speed (which you can act upon once the SEO audit is complete). (Also, it’s a good idea to check whether your site is mobile-friendly; for that, you can use Google’s Mobile-Friendly Test.)
Step 7: Check analytics
For this step, you’re going to make sure your analytics site (either Google Analytics, or whichever site you’re using) is reporting live data. As you work on SEO for your site, you’ll want real-time feedback about how the site is performing on search engines and how much traffic you’re getting from users. If you don’t have live data, you can’t accurately improve your site.
To do this, head to the analytics site you’re currently using (and if you don’t have analytics set up, you should do so now) and compare the current analytics data to the “site:yourwebsite” search data you performed earlier. The number of pages showing in each set of data should be about the same. If so, congratulations, your analytics site is showing live data! If not, make sure the analytics code is installed correctly, and then check your analytics again.
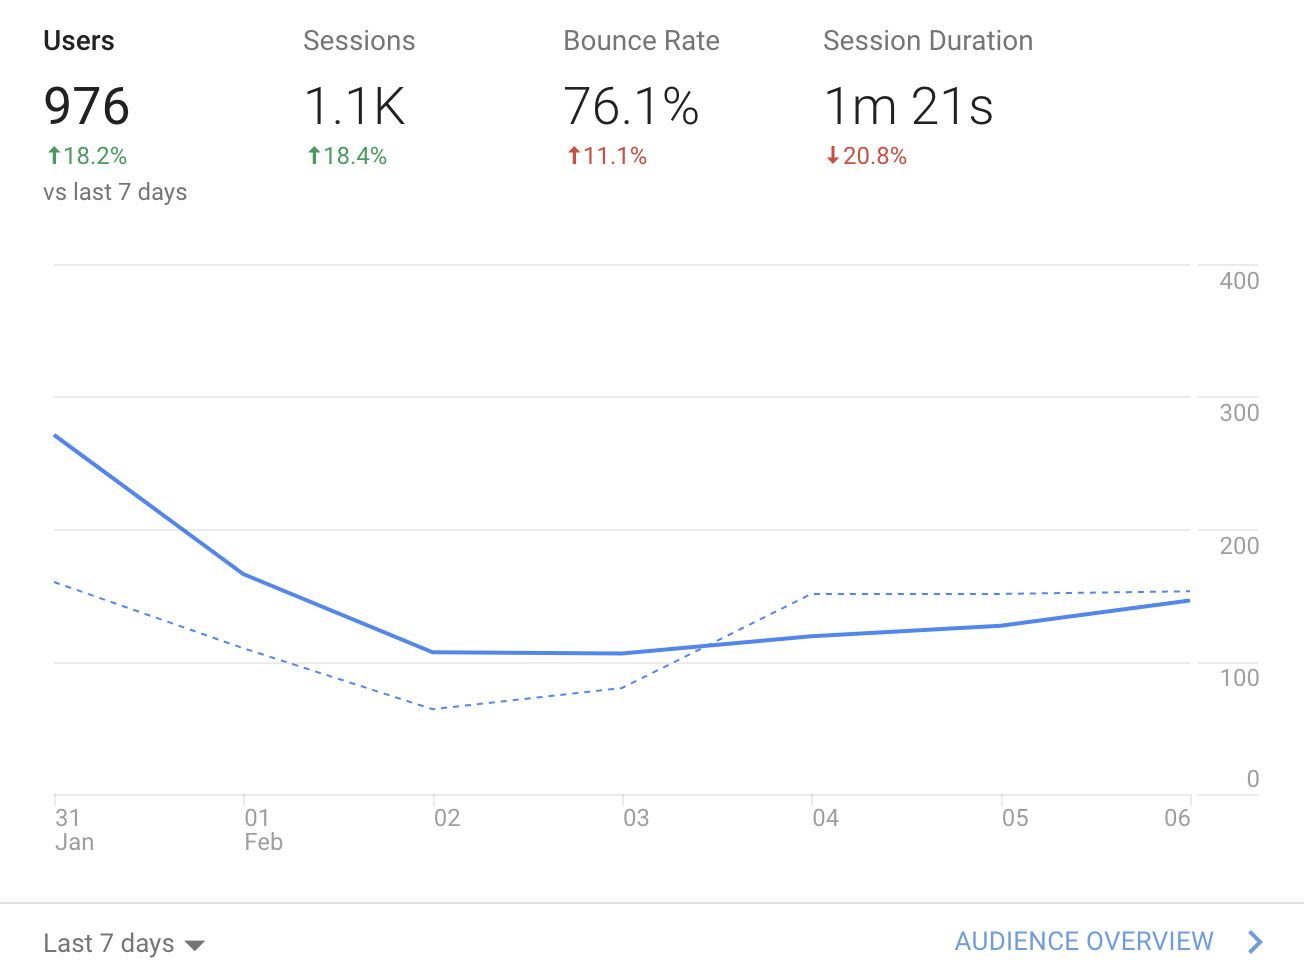
It’s also a good idea to quickly look over recent analytics trends and get an idea of how much organic search engine traffic your site is currently receiving. This will give you good information about where you stand in search engines and how much work you’ll need to do later on to increase traffic.
Step 8: Check off-site SEO
The last step of this process is to perform a backlink and keyword audit. Using either SEMrush or Moz’s free Link Explorer, enter the URL of your site to see an overview of sites that link to your page and keywords you rank for. You can also compare your link profile to that of your competitors to identify content gaps, which will help you later on as you decide what content should be included on your site.
You should also take this time to identify what social media platforms your company/brand is currently posting on or has an account for. It’s a good practice to use social media to increase brand awareness and deliver information to users (and it’s also very important to ensure the platforms you’re using match the ones used by your target demographic).
Wrapping up
With that step, you’ve officially completed your SEO audit! You should now have all the important information about where your website stands with search engines, as well as actionable steps you can take to correct issues and optimize SEO for your site.
Subscribe to Sitegeist
Subscribe and receive timely, strategic advice on what's trending in
digital development, design, and marketing.