The first thing you need to know about Git is that it was hand-crafted by the guy that brought us Linux. Make no mistake, Git thrives in the realm of hard-core coding and is a favorite new toy among coding enthusiasts. The second thing you need to know is that Git is incredibly useful as a project management tool. I mention both Git’s usefulness and the context in which it was developed because Git can be esoteric and difficult. But once you’ve gotten over the learning curve, the benefits fairly leap out. This article aims to give you enough of an understanding so that you can get around Git’s basic features without being overwhelmed by the more complex things it can do.
Why you need version control
First, a rundown of the benefits, then the pain. Git is a Version Control System (VCS), which is essentially a file-sharing system tailored to manage the workflow of a team of developers. With a VCS in place you’ll never overwrite files you’re working on. Instead, each time you make significant changes you add them to a repository of code handled by the VCS. A detailed history of every change you’ve made to the project is maintained by the VCS, giving you the ability to revert back to previous versions of the project. On collaborative projects that undergo lots of iterations, this system can save your ass. Your collaborators can even work on the same code at the same time without creating conflicts. This is possible because each member of the team works on a unique local copy of the project that is in turn merged into the shared repository. For our purposes that shared repository lives on GitHub, an online service that fosters open source collaboration by providing free hosting for coding projects.
Getting Started
You can grab both the GitHub client app and the Git shell for working on the command line from GitHub.com. In a moment I’ll explain why the command line is important. Once you’ve created an account on GitHub, go ahead and create your first public repository.
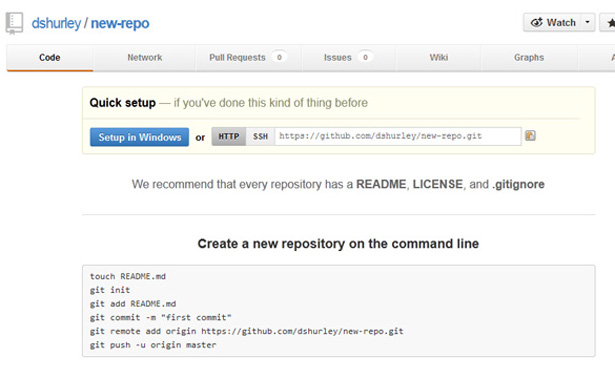
By clicking the “Setup in Windows” button, you’re telling GitHub to launch your Windows client app. (Notice you’re also given instructions for creating a new repository from the command line.) A local folder is created on your system that is synced up with the online repository. This means that any changes you make to local files will automatically be recognized by your GitHub client when you fire it up. I’ll show how to get your changes “pushed” to the shared repository, but first, a brief foray into the command line side of things.
Brevity is the soul of Git
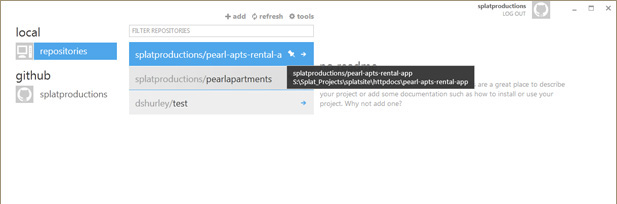
I’ve been leading you by the hand, now it’s time to learn some jargon. Primarily you’re going to be interacting with your repositories via the GitHub client, a fairly easy to use GUI, and the GitHub web site, but it’s crucial that you can fall back on the command line, just in case something doesn’t work. Remember, Git was made by back-end developers, for back-end developers, and will always work in that context. All of the jargon you’re going to pick up has its roots in the Linux culture. Here I’m viewing a list of my local repositories, or “repos”, from the GitHub client:
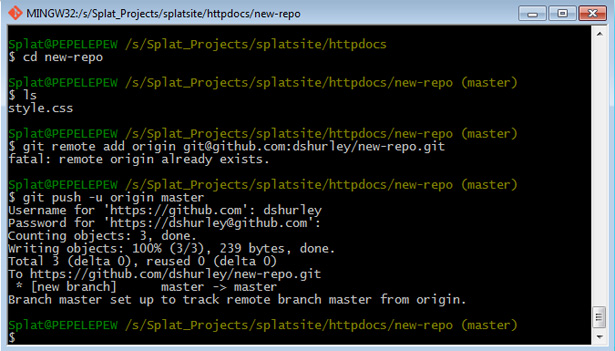
If I wanted to look at a repo from the Git shell, I’d navigate to the appropriate local folder and list its contents:
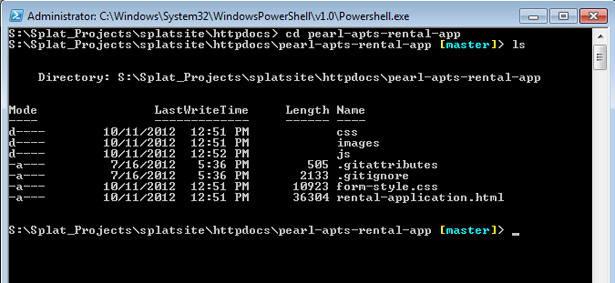
Notice I’m using the Linux commands “cd” to change the directory, and “ls” to list its contents. The goal here is not necessarily to be able to create and view repositories from the command line—that’s easily accomplished on GitHub’s web site and through the client—but rather to get you comfortable enough on the command line so that you can “push” updates to a repo, and “pull” the latest version of a project, should all else fail (Hint: It will).
Adding and Committing
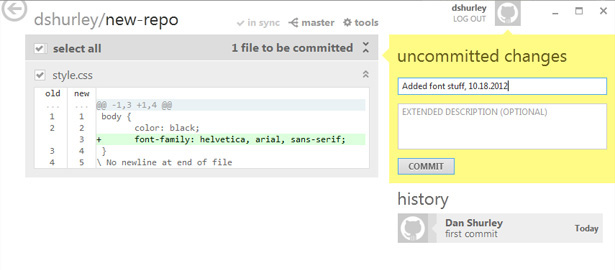
To get started I’ve added the file style.css to my repo simply by dragging it into the new-repo folder, where I’ve told GitHub to look. As you can see, the client app recognizes this as a new file:
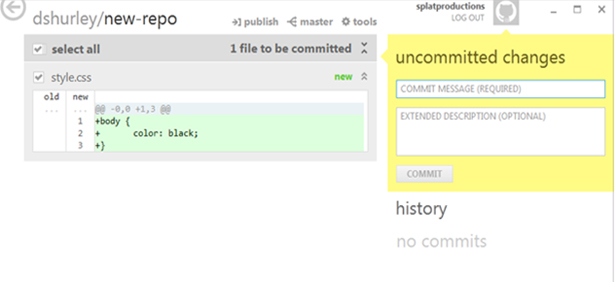
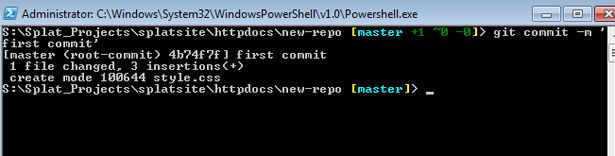
The yellow dialog box on the right tells you that you have “uncommitted changes”. By committing these changes you’ll be taking a snapshot of your staging area. You can do that through the dialog box, making sure to give it a description so you’ll remember where you were at this point in the project. Here’s how to accomplish the same thing on the command line:
Two other commands you’ll use often are “checkout” and “reset HEAD”. Both disregard changes you’ve made locally that you don’t want to commit.
Push It
But you’re still not done. The last step is to “push” your updates to the remote server. Usually this is a simple matter of clicking “publish” in the client app and calling it a day. However, on this occasion I get a fatal error with no explanation provided by the app. When I push the commit from the command line I get an HTTP 403 error. Still a bit perplexed, but at least I can deduce that it’s a permissions issue. In fact, Git uses SSH by default to track changes, so you’ll need to either fix your firewall settings or enter your GitHub credentials on the command line. The solution here is to fire up the Git Bash shell, provided in the GitHub download bundle, and enter these commands:
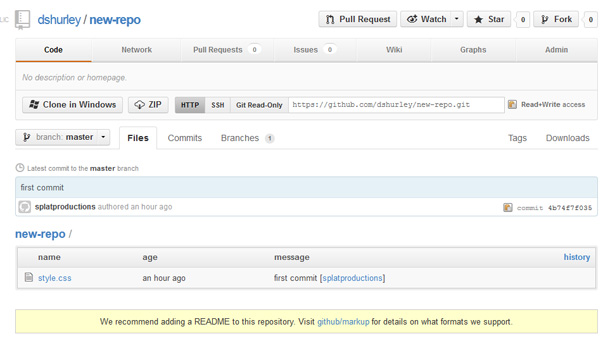
That seemed to work… Navigating to my repo on GitHub.com, I can see the kidney stone of a file I just pushed to the server:
You’re not alone in thinking that it shouldn’t be this painful. Chris Coyier takes a similar approach in his video tutorial entitled, “Let’s Suck at GitHub Together”; he uses a combination of a client app and the command line, copying and pasting the commands GitHub provides, and praying for a desirable outcome, cargo cult-style.
I’m your pusherman
Next we’re going to slightly modify our style.css file to demonstrate Git’s real value: Tracking changes. The highlighted line indicates the addition we’ve made. I’m going to commit this and push it to GitHub by clicking “sync”. Actually, this action simultaneously pushes my changes and pulls new stuff from the server. Oddly, the GitHub client doesn’t seem to give us a more granular option. For now, this will suffice.
Now we’ve got two commits, or snapshots, of our project in progress:
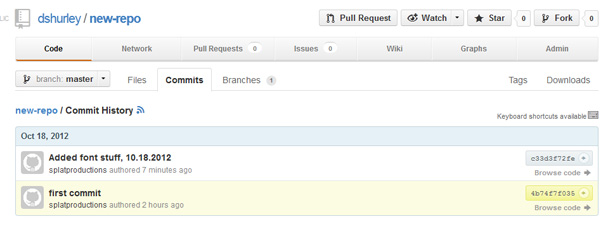
Should the need arise, you can roll back to any of these commits. This can be really useful as a troubleshooting tool, allowing you to revert back to the last working version of a project. I can also imagine a scenario where a client wants to bring back a feature that’s been removed, in which case it’s a matter of digging through your commit history.
Pulling your Weight
We’ve added files, committed them to our local staging area, and pushed them to a repo. Pulling updates from the server should be a snap. In the context of an ongoing project it’s good practice to “pull” changes first, ensuring that you’re working with an up-to-date local copy. The GitHub client will alert you if there are files to be pulled. You may also be asked by the client to “clone” a local copy of the shared repo. This is essentially the same as pulling the entire repo. You can pull files from the GitHub server on the command line like so:
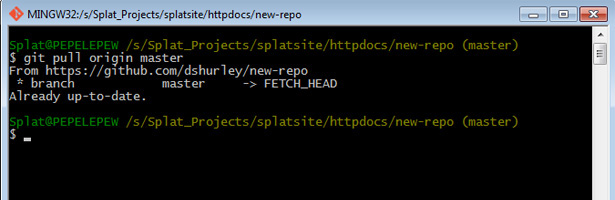
In this instance, there’s nothing new to grab.
Conclusions and Further Reading
I’ve introduced you to the tools you need to carry out the most common tasks. The operations that I haven’t covered mostly pertain to developers experimenting with code branches on open source projects. Briefly, GitHub is a buzz-worthy VCS because it encourages developers to create break-out projects, or “forks”, that they can work on independently, submitting their patches to a central repo and wowing their coding buddies. There’s a good chance your back-end developer friends love GitHub, and you should too. I didn’t say it was easy to use, but as it gains wider adoption, from front-end developers to project managers, it will necessarily become easier to use. You’ll thank yourself later.
Here are a few additional resources to get you started with Git that assume you hate the command line:
And two well put together guides that love the command line:
If you’re ready for a more comprehensive technical guide, and you need to give your eyes a rest, I recommend Travis Swicegood’s Pragmatic Guide to Git from Pragmatic Bookshelf.